ha-netro-watering
Netro Smart Garden Integration for Home Assistant
📑 Table of Contents
- ℹ️ About
- 📖 Description
- 🌱 Installation
- ⚙️ Configuration
- 🔐 Netro Public API v2
- 🌦️ Netro Weather Sync Blueprint
- 🖼️ Lovelace cards
- 🛠️ Advanced configuration
- ☕ Support
ℹ️ About
Home Assistant integration for Netro Smart Garden devices. It lets you manage Netro controllers and soil sensors to monitor conditions, control zones, and automate watering from Home Assistant.
The integration uses Netro’s Public API for device access and scheduling.
Compatibility: developed and tested with Home Assistant 2023.4.0 and later.
This project is community-maintained and not affiliated with Netro, Inc.
📖 Description
This integration connects your Netro controller and sensors to Home Assistant so you can view soil moisture and temperature and control watering schedules.
What you get:
- Devices: Controllers, Zones (one device per physically connected valve), and Soil sensors (moisture, temperature, illuminance).
- Entities: per-zone switches to start/stop watering, controller-level enable/disable switches, sensor readings, and a calendar entity showing Netro’s planned watering schedule.
- Services: start/stop watering, enable/disable controller, refresh data, report weather, set moisture level, and suspend watering for N days.
Why use it
- Monitor real-time soil moisture and environmental data to fine-tune irrigation.
- Manually start or stop watering zones from Home Assistant or include them in automations and scenes.
- Combine Netro’s scheduling with Home Assistant weather and sensors to build smarter, water-saving automations.
Notes
- The number of zones exposed depends on your controller model; only valves physically connected to the controller are shown.
- Supported models (Netro): Sprite, Spark, Pixie and Whisperer.
- Requires a Netro account and valid serial keys configured during integration setup.
🌱 Installation
🛒 From HACS
- Install HACS if you haven’t already (see the installation guide).
- In Home Assistant, open HACS → Integrations, search for Netro Watering, and install it.
- Restart Home Assistant.
- Go to Settings → Devices & Services → Add Integration, search for Netro Watering, and add it.
📦 Manual
- Download and unzip the repo archive.
(Alternatively, click Code → Download ZIP, or clone the repo.) - Copy the integration into your config so that this path exists:
/config/custom_components/netro_watering/If the archive contains
custom_components/netro_watering/, copy that folder as-is. - Restart Home Assistant.
- Go to Settings → Devices & Services → Add Integration, search for Netro Watering, and add it.
⚙️ Configuration
Repeat step 4 for each device you want to include — whether a soil sensor, a multi-zone controller (Sprite or Spark), or a single-zone controller (Pixie).
Each zone managed by a controller is created as a separate device linked to that controller.
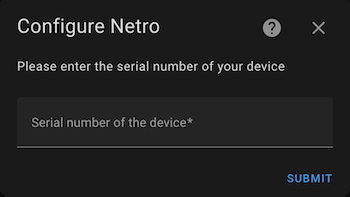
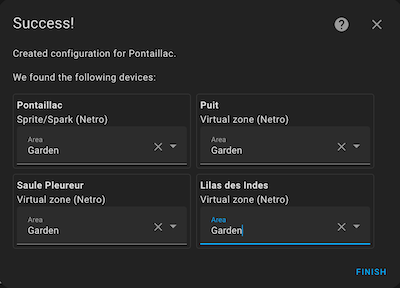
After setup, you may see multiple devices and dozens of entities, including:
- Soil sensors: moisture, temperature, and illuminance.
- Zones: current/last/next watering status; switches to start/stop watering.
- Controllers: switches to enable/disable controllers; a calendar per controller showing watering schedules planned by Netro.
Polling intervals can be configured separately for sensors and controllers. A default watering duration can be set per controller. Advanced settings are available for both sensors and controllers.
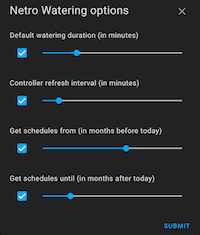

ℹ️ Note You no longer need to reload the device after changing options. Changes are applied automatically.
- Most updates take effect on the next polling cycle.
default_watering_delayanddelay_before_refreshapply to subsequent commands.sensor_value_days_before_todayis used on the next sensor update.- No manual reload or restart is required (except for internal fields like
netro_api_url, if instructed).
🔐 Netro Public API v2
By default, the integration uses version 1 of the Netro Public API, which authenticates devices using their serial numbers. However, you can switch to version 2, which uses API keys generated on demand for each device.
API keys provide a higher level of security: they can be regenerated if compromised, unlike fixed serial numbers.
To use API v2, simply specify the corresponding URL in your Home Assistant configuration file:
netro_watering:
  netro_api_url: https://api.netrohome.com/npa/v2/
⚠️ Important:
Some recent Netro devices only work with API version 2.
If your device is rejected when using a serial number with API v1 (the default), carefully check the error message.
It may indicate that you need to use API v2 and an API key for authentication.
🌦️ Netro Weather Sync Blueprint
This blueprint allows you to synchronize your Netro smart watering system with current weather conditions using Home Assistant data. It dynamically adjusts watering schedules to prevent watering during rain or when humidity is high, helping you save water efficiently.
Installation (Import the Blueprint)
You can easily import this blueprint into your Home Assistant instance.
Manual import (alternative):
- In Home Assistant, open Settings → Automations & Scenes → Blueprints → Import Blueprint.
- Paste the following URL into the Blueprint address field:
https://raw.githubusercontent.com/kcofoni/ha-netro-watering/main/blueprints/script/kcofoni/netro_weather_sync.yaml - Click Preview, then Import.
How to Use
After importing the blueprint:
- Go to Settings → Automations & Scenes → Scripts.
- Click ➕ Create Script → Use Blueprint.
- Select Netro Weather Sync from the list.
- Configure the required inputs:
- Netro Controller: select the controller entity to sync.
- Weather Entity: select the source weather entity (e.g.
weather.paris). - Rain Probability Entity (Optional): sensor entity for rain probability if available.
- Save the script, then run it manually or call it from an automation.
💡 Tips
- Schedule this script to run once or twice per day (for example, at sunrise or in the evening).
- Combine it with the built-in Weather integration or your preferred local provider.
- You can trigger it anytime via Developer Tools → Services → script.netro_weather_sync.
- Ensure your Netro integration is properly configured and authenticated before running the script.
🖼️ Lovelace cards
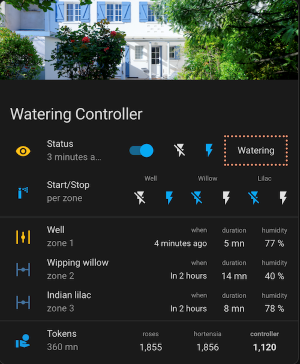
Here are some Lovelace cards used to control the watering system with this integration.
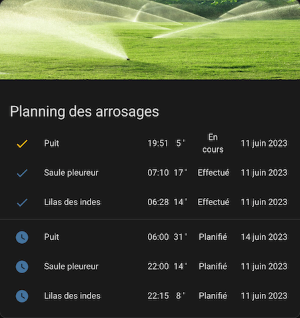
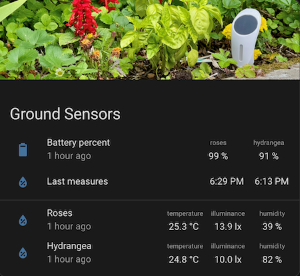
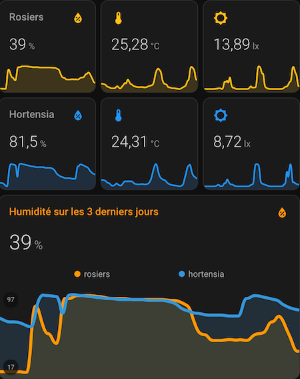

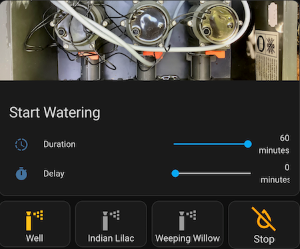
⏰ Example Automation
The Netro Watering entities may be integrated into automations. The following integration custom services are available:
- Start watering and Stop watering - to be applied to any controller or zone.
- Enable and Disable - to be applied to any controller.
- Refresh data - allows to update the data of the devices (controller, zones, sensors) when desired
- Report weather - for reporting weather data, overriding system default weather data
- No water - suspend watering for a given number of days on the specified controller
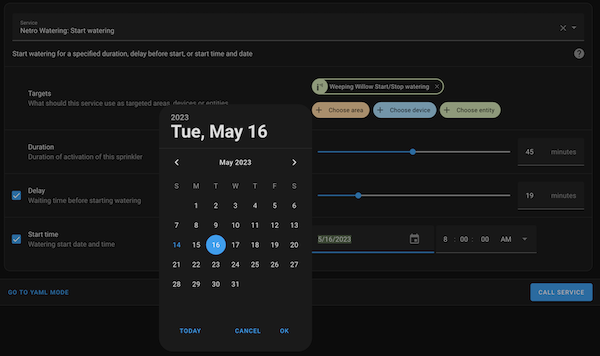
💧 Set moisture level
Netro’s irrigation planning algorithms use area layout, plant types, soil properties, weather forecasts, and current temperature and soil moisture to calculate watering. Netro’s soil sensors (the Whisperer model) provide the required moisture readings. If you don’t have Netro sensors but have other reliable soil sensors, you can provide their moisture level to Netro so it can use that information in its calculations.
The Set moisture service exposed by the integration can be called for a specific zone to report a custom moisture level.

🌦️ Report weather
Netro supports receiving custom weather data, which can improve the accuracy of its watering schedules. The integration exposes a Report weather service that accepts common weather fields (temperature, humidity, rain amount, rain probability, min/max temperatures, wind speed, etc.).
You can create a small Home Assistant script or automation that gathers data from your preferred weather sensors or provider and calls this service. See the Netro Weather Sync Blueprint for a ready-to-use example that collects weather data and forwards it to Netro.
Note: the example below calls the script created by the Netro Weather Sync blueprint (for instance script.netro_weather_sync_meteo_france). If you imported the blueprint and created a script from it, use the script entity name generated by Home Assistant. Otherwise, create a script with that name or adapt the automation to call your own script/service.
Example automation (YAML)
alias: Synchro Netro Météo France
description: Update Netro with Météo France data twice daily
triggers:
  - at: "06:00:00"
    trigger: time
  - at: "18:00:00"
    trigger: time
actions:
  - action: script.netro_weather_sync_meteo_france
    data:
      number_of_days_forecast: ""
variables:
  number_of_days_forecast: 5
🛠️ Advanced configuration
You can configure a few general settings for the Netro Watering integration in Home Assistant’s configuration.yaml. These settings are optional and not tied to a specific device. The integration works well without them, but they can optimize behavior or cover specific use cases. If omitted, default values are used.
slowdown_factors(default: null) — A mapping of time windows to a multiplier applied to the controllers’ polling interval (sensors are not affected). During matching windows, the effective polling interval becomes: base_interval × multiplier (typically > 1 to slow down).netro_api_url— For internal use only.
The following parameters were previously defined in the configuration file, but the UI options now take precedence for both sensors and controllers.
-
delay_before_refresh(default: 5 s) — Wait time before fetching status from the Netro Public API (NPA) after sending a command (e.g., start watering). In practice, ≥ 4 s is needed; 5 s is a safe default. If set too low, you may read stale state. -
default_watering_delay(default: 0 s) — Grace period before actually starting irrigation after a start command. Useful for testing start/stop switches without opening valves. For production, keep 0 s. -
sensor_value_days_before_today(default: 1, min: 1) — Look-back window (days) for sensor history used by the integration. If a sensor is temporarily offline, the last value within this window can be reused. Larger values increase the risk of stale data.
About the slowdown factor
As indicated in the documentation, the number of calls to the Public API of Netro is limited. Today, a maximum of 2,000 calls per day and per device is permitted and the counter is reset every day at midnight UTC. Netro does not provide mechanisms that reference a callback function, as do a number of similar systems, so that each event is notified as it occurs. For this reason, it is useful to frequently request the system to obtain a state of the situation, as faithful as possible to reality, at “t” time.
The configuration of a device (controller or sensor) within the UI makes it possible to define, as shown above, a specific polling frequency (refresh interval). One may wonder if this refresh period should be the same regardless of the time of day. There are indeed time slots on which there is no gain in polling the system very often (at night for example) and, conversely, times when watering is very likely and which requires close monitoring.
The slowdown factor (sdf) temporarily multiplies the controllers’ polling interval during specified time windows (sensors are not affected).
Formula: effective_polling_interval = base_interval × sdf
Times use 24-hour
HH:MMformat and can cross midnight (see first window below).
Example (configuration.yaml)
slowdown_factors:
  - from: '23:00'  # overnight: slow down while everyone sleeps
    to:   '05:55'
    sdf:  15       # polling interval ×15 in this window

  - from: '10:30'  # hottest/sunniest hours: fewer checks or only occasional watering
    to:   '17:00'
    sdf:  5        # e.g., if base is 2 min, becomes 10 min between 10:30 and 17:00
Outside the defined windows, the nominal polling interval is used. This approach allows a short nominal interval while selectively slowing controller polling at certain times of day.
Example of Netro configuration in configuration.yaml
netro_watering:
  delay_before_refresh: 5            # seconds
  default_watering_delay: 0          # start watering immediately
  sensor_value_days_before_today: 2  # use last readings up to "day before yesterday"
  slowdown_factors:
    - from: '23:00'  # overnight: slow down while everyone sleeps
      to:   '05:55'
      sdf:  15       # polling interval ×15 in this window
    - from: '10:30'  # hottest/sunniest hours: fewer checks
      to:   '17:00'
      sdf:  5        # e.g., base 2 min -> 10 min in this window
☕ Support
If you like this project, you can buy me a coffee !


